ConnectWise Manage Internet Client Checklist
Want to ensure you get the best experience using the client version? Follow the steps below!
Click here to download a printable version.
When to Use this Document:
- During Installation: We recommend that you use this document to help you install the ConnectWise Manage Internet Client and specifically if you are using the Browser version of ConnectWise Manage.
- Troubleshooting Errors: If errors occur while you use ConnectWise Manage, this document will confirm and provide the correct workstation configurations for you to troubleshoot your issues.
Ensure that you have .NET Framework 3.5, .NET FrameWork 4.0, .NET Framework 4.5, .NET FrameWork 4.5.2, .NET Framework 4.6.1, .NET Framework 4.7.2, and .NET FrameWork 4.8. Download the latest version here.
Note: ConnectWise Manage is optimized to run in the browser. The Internet Client is only required for the TAPI and QuickBooks desktop integrations. For more information about the browser version, refer to the
ConnectWise Manage Browser Version Checklist.
The following folders and sub-folders should be excluded in your antivirus software.
- C:\Users\[YourUserName]\AppData\Roaming\connectwise
- C:\Program Files\ConnectWise
- C:\Program Files (x86)\ConnectWise
Note: This folder may be hidden by default. To display it, navigate to My Computer > Organize > Folder and Search Options > View tab > Hidden files and folders. Select to Show hidden files, folders and drives and then click OK.
If you experience errors while using ConnectWise Manage, it is suggested that you delete the following folder as part of the clear cache process. Replace [username] with your name:
C:\users\[username]\appdata\roaming\connectwise\cache
Note: This folder may be hidden by default. To display it, navigate to My Computer > Organize > Folder and Search Options > View tab > Hidden files and folders. Select to Show hidden files, folders and drives and then click OK.
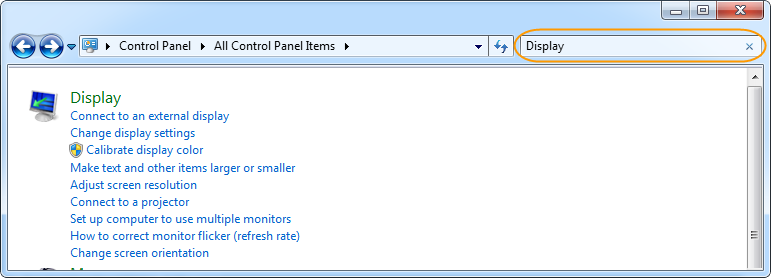
- Navigate to Start > Control Panel.
- Search for Display in the Search Control Panel field.

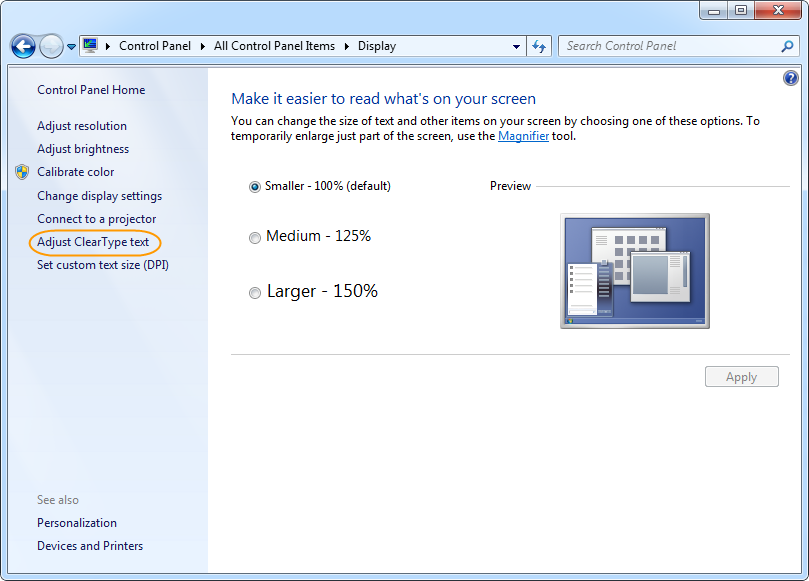
- Select the main Display option.
- In the Make it easier to read what's on your screen section, select the Smaller - 100% (default) option.
- Click Apply.
- Navigate to Start > Control Panel.
- Search for Display in the Search Control Panel field.

- Select the main Display option.
- Select Adjust ClearType text from the menu on the left.

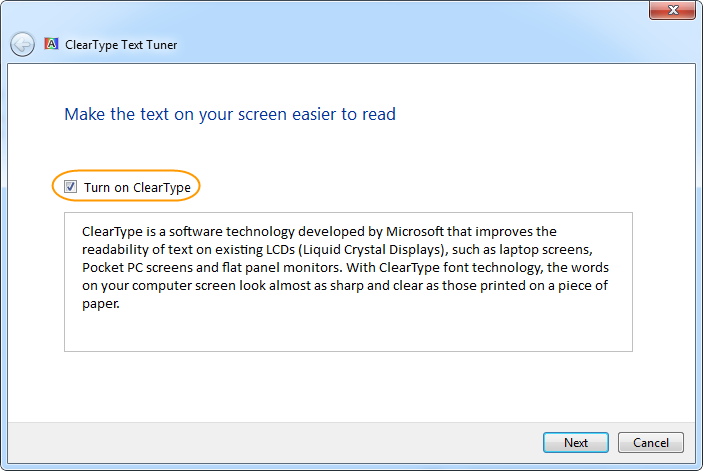
- Enable the Turn on ClearType option, then click Next.

- Complete the tuning options.
- Click Finish.